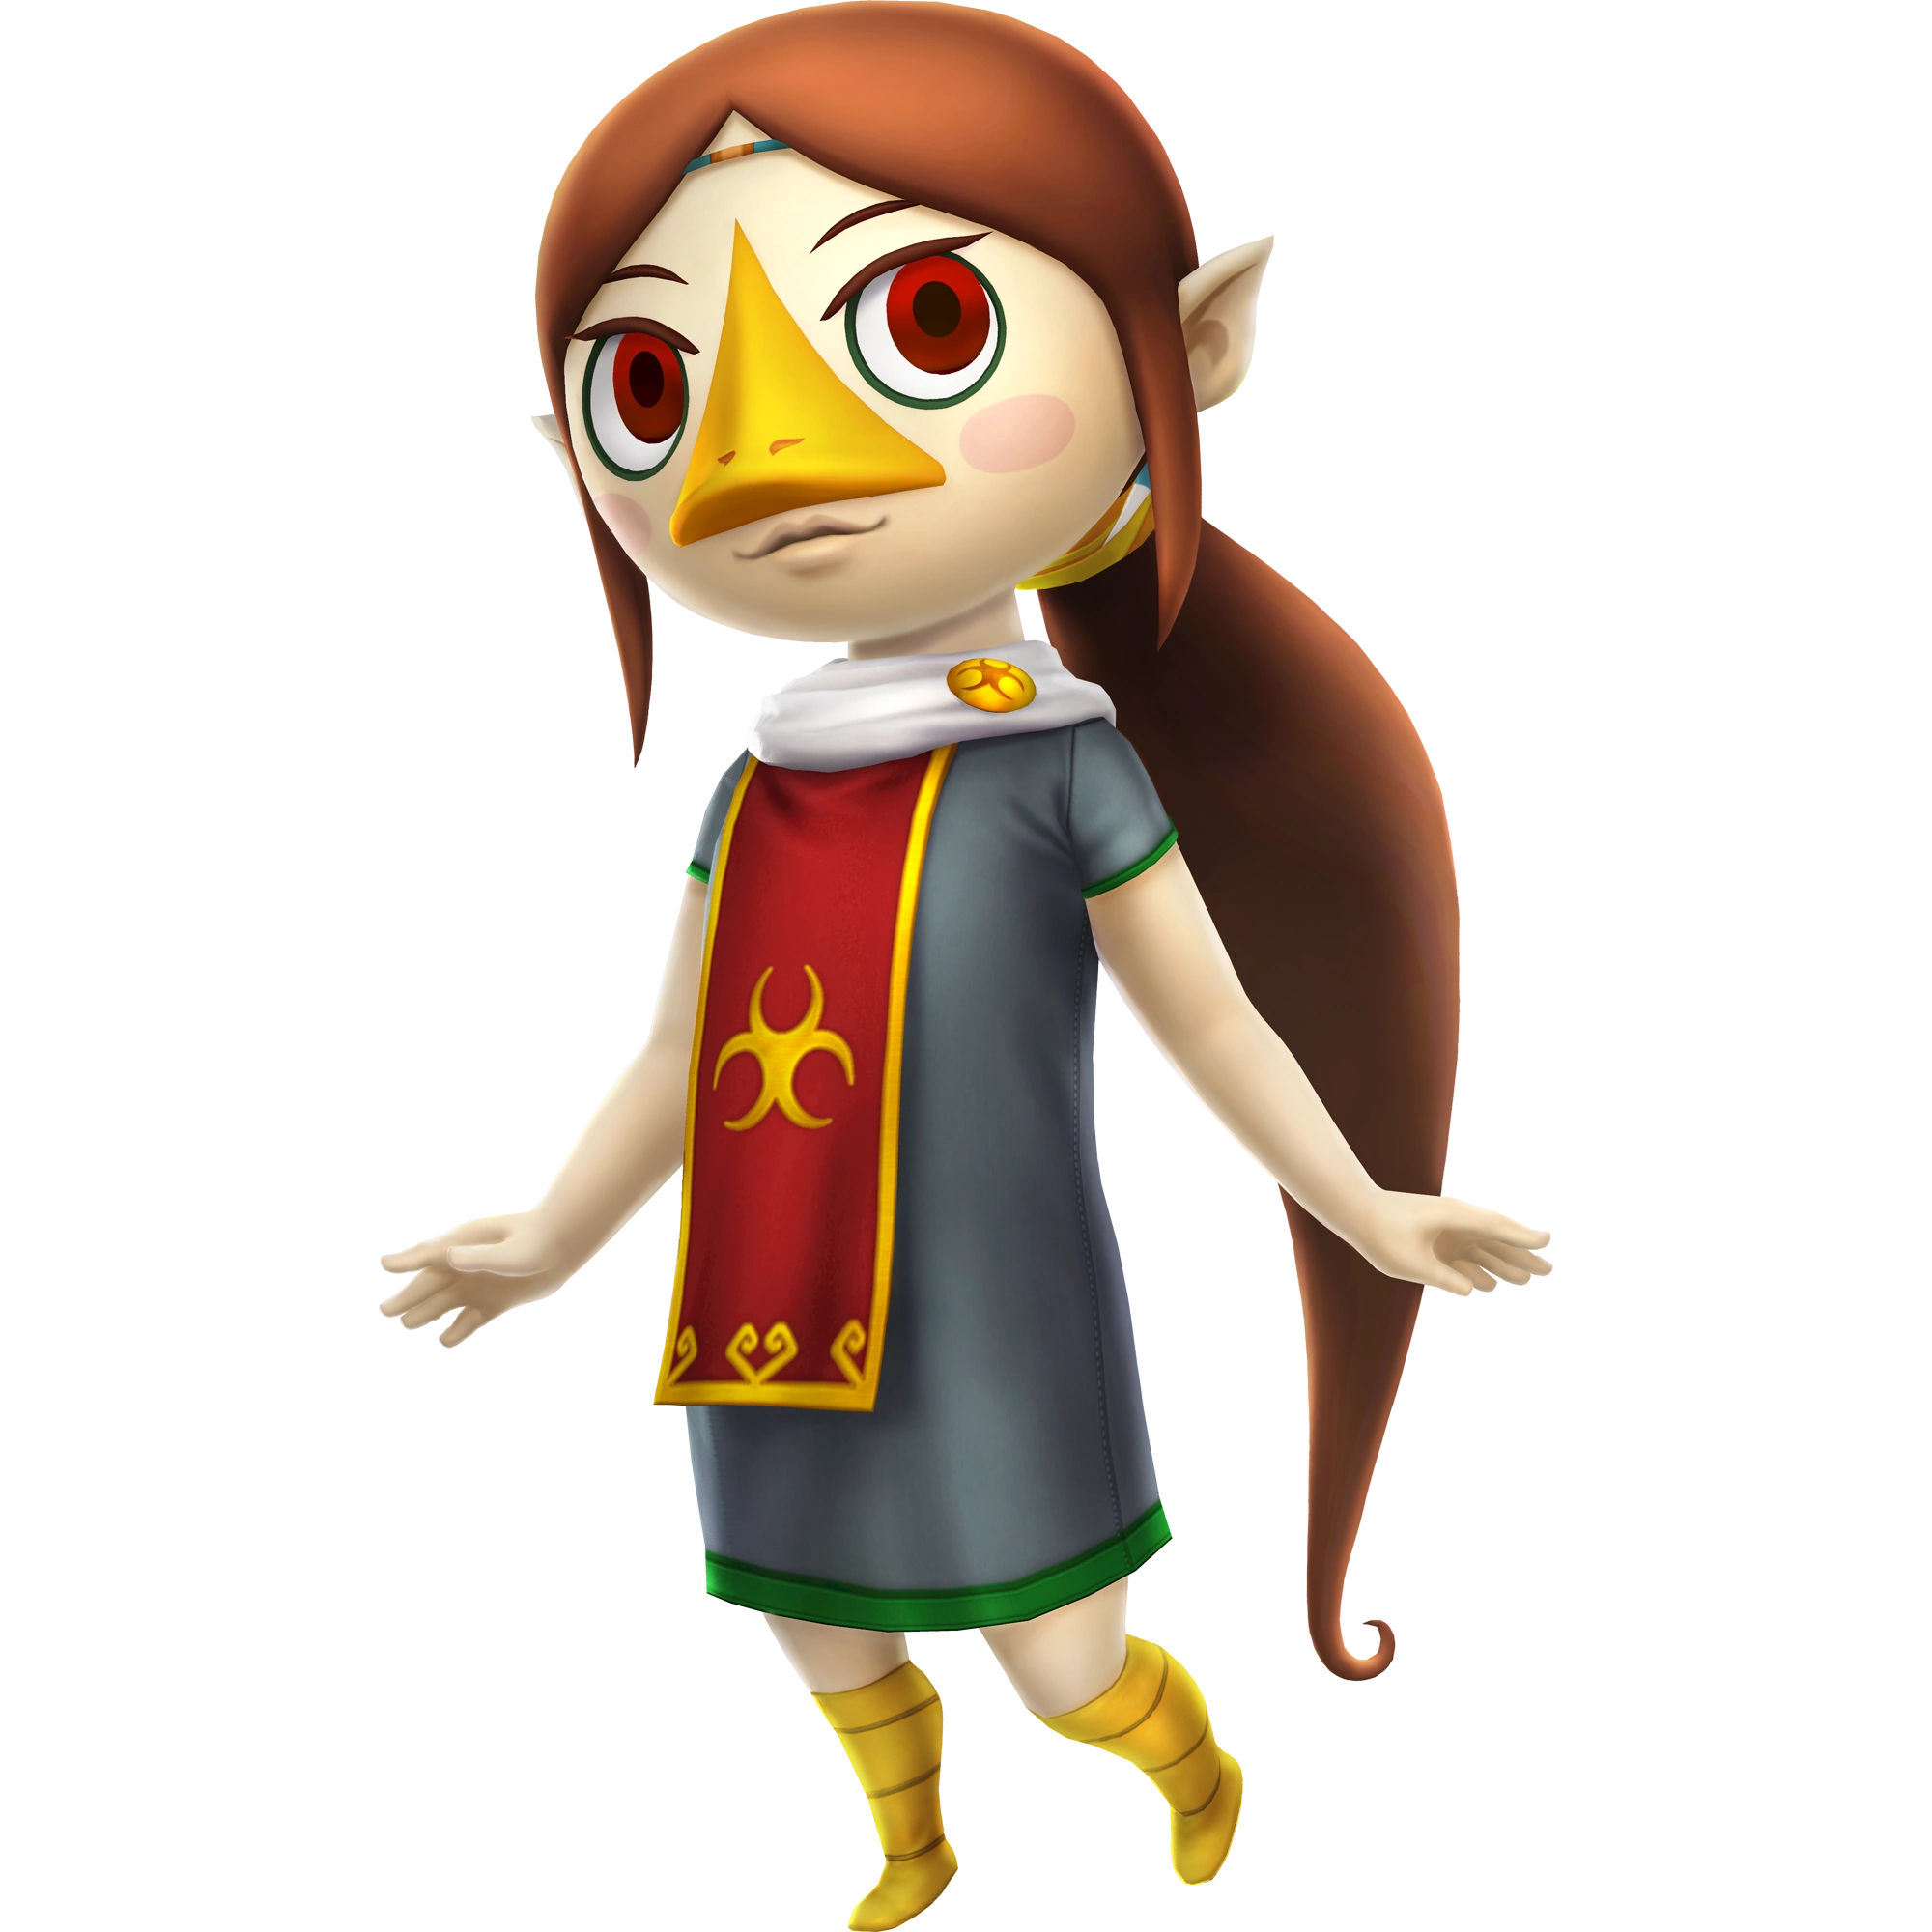
| Medli | |
 | |
| Era: | |
| Race: | |
| Title(s): | Sage of Earth
|
| Occupation: | Valoo's Attendant
|
| Weapon(s): | Rito Harp
|
| Weakness: | Darkness
|
| Useful Weapon Skill: | VS Sea
|
| Voice Actors: | Chiaki Takahashi
|
| First Appearance: | Hyrule Warriors + Legends |
| Playable via update. | |
Medli (メドリ, Medori) is a playable character in Hyrule Warriors Legends. She originated from The Wind Waker. She is the personal attendant of the Dragon Deity of her home land, Valoo, and the Sage of the Earth.
Role in Game[]
Medli currently does not have a story significant role in Hyrule Warriors due to being a DLC character that was added to the game post launch.
Medli has unlockable weapons and appears as both an ally and as an enemy in the Master Wind Waker map. She plays a minor story role in the Master Wind Waker Puzzle Rewards Map.
Character Information[]
Personality[]
Medli is a sweet, young girl who hails from Dragonroost Island, the home land of her people, the Rito. She's very polite and generous to those whom she meets, always giving a courteous bow in their direction when speaking to them. However she has self doubt issues, and often questions her ability to do almost anything, yet she holds a soft determination that manages to get her through most troubles. She tends to put others before herself and as a result will often times put herself in dangerous situations to help those in need, yet her cautious and positive outlook helps her manage to get through said dangers.
She also has a playful and somewhat mischievous side to her personality as well. Her desire and determination to help others can often times allow her to willing bend, or break, the rules set by authoritative figures for what she considers the greater good.
Quotes[]
- See also: Medli/Quotes
Gameplay[]
| Keys: | Y Normal Attack ▲ | X Charge Attack ▲ | A Special Technique ▲ | B Evade |
Rito Harp[]
If Medli ever finds herself in the air, pressing Y while in the air will cause her to perform a series of powerful wing beats and dash attacks, juggling enemies in the air. Pressing X will cause her to perform a powerful spiraling dive bomb attack that damages airborne enemies on her way down, and cause a minor explosion upon impacting the ground and damaging enemies. If her Unique Ability Bar is full and the players presses B she is able to dash forward momentarily, up to three times, allowing for multiple Y combos.
- X: Performs a corkscrew attack directly into enemies in front of her. Fully charges her unique ability bar.
- Y, X: Dashes into the air and performs a back flip kick to knock enemies into the air. Can be comboed with her air attacks.
- Y, Y, X: Dashes forward and trips, falling to the ground and sends enemies flying.
- Y, Y, Y, X: Performs a series of zig-zag patterns in the air, gaining altitude gradually, to knock enemies into the air and damaging them as she does so. Can be combo-ed with her air attacks.
- Y, Y, Y, Y, X: Spins around forming a tornado that launches her into the air. Draws in enemies during the tornado's creation. Enemies are scattered and sent flying as she falls back to the ground.
- Y, Y, Y, Y, Y, X: Plays her harp as beams of light shoot rain from the sky in front of her. A magic emblem forms on the ground as she plays her harp. It then explodes and sends enemies flying. Fully charges her unique ability bar.
- Y, Y, Y, Y, Y, Y, Y: Plays her harp, shooting out gusts of wind to damage enemies. Combo finisher ends with forming a tornado to draw in enemies, and shooting a beam of light from her harp (can be redirected to attack multiple angles) before sending enemies flying after the tornado explodes.
- A: Creates a massive orb of wind that damages enemies while drawing them in. Then jumps up into the air and then dive-bombs into the enemies in the orb of turbulent wind.
- Focus Spirit + A: Looks around a few moments before flying forward, flapping her wings, and sending out a burst of wind all around her.
- Focus Spirit Finisher: Plays her harp softly before gracefully spinning and holding her harp out in front of her, forming an explosion of light to send enemies flying.
- Weak Point Smash: Summons a small orb of wind over her head, then jumps up into the air and flies around it forming a tornado, before flying into the center of it and causing the tornado to explode.
Weapons[]
The second, third, and + variations cannot be unlocked without the Master Wind Waker DLC pack in Legends.
| Weapon Information (Element: Light) | ||
|---|---|---|
| Description: A harp imbued with holy power. The sage's prayer allows it to store the power of wind with a Strong Attack, enabling an evasive attack by pressing B while airborne. | ||
| Sacred Harp | Skill Slots: 1~2 | |

|
Base Attack: 80 | 1★ Attack: 88 |
| 2★ Attack: 96 | 3★ Attack: 104 | |
| 4★ Attack: 112 | 5★ Attack: 120 | |
| Earth God's Harp | Skill Slots: 3~4 | |
|
Base Attack: 150 | 1★ Attack: 165 |
| 2★ Attack: 180 | 3★ Attack: 195 | |
| 4★ Attack: 210 | 5★ Attack: 225 | |
| Din's Harp | Skill Slots: 6~8 | |

|
Base Attack: 280 | 1★ Attack: 308 |
| 2★ Attack: 336 | 3★ Attack: 364 | |
| 4★ Attack: 392 | 5★ Attack: 420 | |
| Din's Harp + (Legends) | Skill Slots: 7~8 | |
|
|
Base Attack: 500 | 1★ Attack: 550 |
| 2★ Attack: 600 | 3★ Attack: 650 | |
| 4★ Attack: 700 | 5★ Attack: 750 | |
| Din's Harp of Oceans (Definite Edition) | Skill Slots: 7~8 | |
|
|
Base Attack: 500 | 1★ Attack: 550 |
| 2★ Attack: 600 | 3★ Attack: 650 | |
| 4★ Attack: 700 | 5★ Attack: 750 | |
| Secondary Element: Water | ||
Badge Materials[]
- See also: Hyrule Warriors/Badges
| Badge | Materials | ||
|---|---|---|---|
| Kokiri Sword I | |||
| Kokiri Sword II | |||
| Kokiri Sword III | |||
| Kokiri Sword IV | |||
| Stamina Fruit I | |||
| Stamina Fruit II | |||
| Stamina Fruit III | |||
| Digging Mitts I | |||
| Digging Mitts II | |||
| Digging Mitts III | |||
| Din's Fire I | |||
| Din's Fire II | |||
| Din's Fire III | |||
| Hover Boots I | |||
| Hover Boots II | |||
| Hover Boots III | |||
| Fierce Deity's Mask I | |||
| Fierce Deity's Mask II | |||
| Badge | Materials | ||
|---|---|---|---|
| Empty Bottle I | |||
| Empty Bottle II | |||
| Empty Bottle III | |||
| Hornet Larvae I | |||
| Hornet Larvae II | |||
| Hornet Larvae III | |||
| Nayru's Love I | |||
| Nayru's Love II | |||
| Nayru's Love III | |||
| Goron Tunic I | |||
| Goron Tunic II | |||
| Goron Tunic III | |||
| Zora Tunic I | |||
| Zora Tunic II | |||
| Zora Tunic III | |||
| Magic Armor I | |||
| Magic Armor II | |||
| Magic Armor III | |||
| Sacred Shield I | |||
| Sacred Shield II | |||
| Sacred Shield III | |||
| Mirror Shield I | |||
| Mirror Shield II | |||
| Mirror Shield III | |||
| Badge | Materials | ||
|---|---|---|---|
| Farore's Wind I | |||
| Farore's Wind II | |||
| Farore's Wind III | |||
| Goron's Bracelet I | |||
| Goron's Bracelet II | |||
| Hawkeye I | |||
| Hawkeye II | |||
| Beetle I | |||
| Beetle II | |||
| Whip I | |||
| Whip II | |||
Gallery[]
")
External Links[]
| This Hyrule Warriors related article is a stub. You can help the wiki by expanding it. |
| Hyrule Warriors • Legends • Definitive Edition • Hyrule Warriors: Age of Calamity |
| Characters |
| Hyrule Warriors |
| Link • Impa • Sheik • Lana • Princess Zelda • Ganondorf • Darunia • Princess Ruto • Agitha • Midna • Zant • Fi • Ghirahim • Cia • Volga • Wizzro • Twili Midna • Young Link • Tingle • Ganon • Cucco |
| Hyrule Warriors Legends |
| Linkle • Skull Kid • Toon Link • Tetra • King Daphnes • Medli • Marin • Toon Zelda • Ravio • Yuga |
| Hyrule Warriors Age of Calamity |
| Urbosa • Mipha • Daruk • Revali • Hestu • Sidon • Yunobo • Teba • Riju • Maz Koshia • Master Kohga • King Rhoam • Great Fairies • Terrako |
| EX: Pulse of the Ancients |
| Battle-Tested Guardian |
| EX: Guardian of Remembrance |
| Sooga • Purah & Robbie |
| Bosses |
| King Dodongo • Gohma • Manhandla • Argorok • The Imprisoned • Ganon • Great Fairy Helmaroc King • Phantom Ganon • Astor |
| Locations |
| Hyrule Warriors |
| Hyrule Field • Eldin Caves • Faron Woods • Valley of Seers • Death Mountain • Lake Hylia • Twilight Field • Palace of Twilight • Skyloft • Sealed Grounds • Temple of the Sacred Sword • Temple of Souls • Gerudo Desert • Ganon's Tower |
| Hyrule Warriors Legends |
| Forsaken Fortress • Wind and Earth Temples |
| Hyrule Warriors Age of Calamity |
| Breach of Demise • Zora's Domain • Tabantha Frontier • Gerudo Town • Hyrule Outpost • Great Hyrule Forest • Cenel Peak • Akkala Citadel • Yiga Clan Hideout • Damel Forest • Hyrule Castle • Lanayru Wetlands • Hyrule Ridge • Fort Hateno • Great Plateau • Hyrule Castle Town |
| EX: Guardian of Remembrance |
| Goponga Village • Kakariko Village • Lanayru Road • Mount Daphnes |
| Features |
| Items • Adventure Mode • Unit Types • Potion Mixtures • Badges • Materials • Weapon Skills • My Fairy |